CyberPanel offer you one click installtion of the Redis. CyberPanel allows you a very quick and easy setup for the Redis. Redis CyberPanel is a very advanced and new feature.
Redis is an open-source cache used to cache databases and is used as a message broker. Nowadays it is very important to use cache and boost your website. CyberPanel helps you to do this.
CyberPanel is a web hosting control panel designed to manage websites and servers. It is built on top of OpenLiteSpeed or LiteSpeed Enterprise, which are high-performance web servers known for their speed and security. CyberPanel provides an easy-to-use graphical interface for handling website management tasks such as creating and managing domains, setting up SSL certificates, handling DNS, and managing databases.
Redis CyberPanel | Setup Redis Using CyberPanel:
Follow these steps to set up Redis on your server.
- Login to CyberPanel: Access your CyberPanel control panel by visiting
https://yourdomain.com:8090, then log in with your username and password. - One-Click Redis Installation: Navigate to the Manage Services section in CyberPanel, select Applications, and click Install Redis for a quick, automatic setup of the Redis server on your machine.
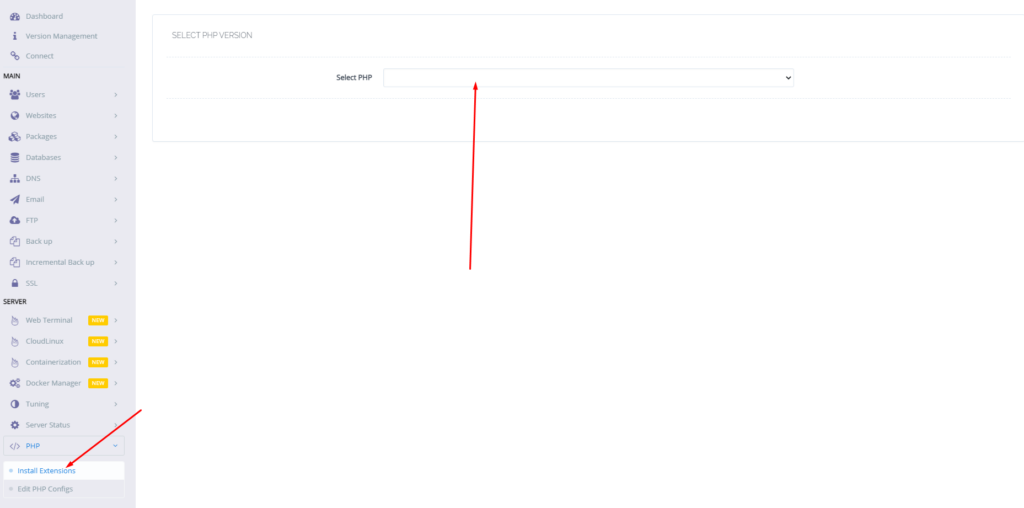
- Install the Redis PHP Extension: Go to the PHP section in CyberPanel, click on Install Extensions, search for Redis, and click Install to add the Redis PHP extension for Redis-PHP communication.
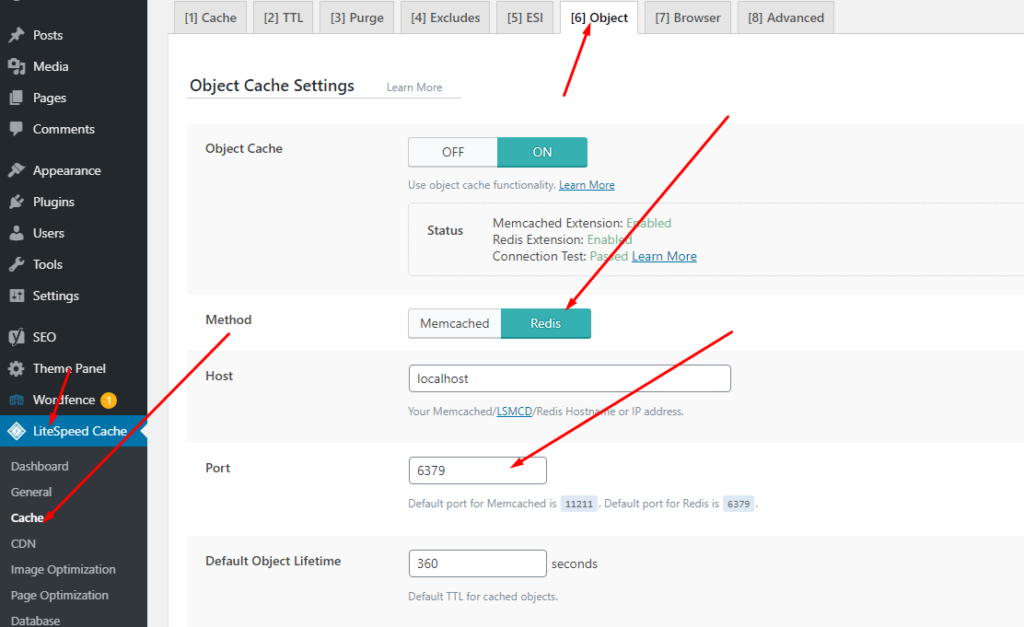
- Setup Redis on WordPress using LiteSpeed Cache (LS Cache): Log in to WordPress, navigate to LiteSpeed Cache > Cache > Object, enable Object Cache, set Redis as the method, change the port to 6379, and save the settings; ensure that both the Redis PHP extension and connection test pass to confirm Redis is configured properly.
Login to CyberPanel:
Login to your CyberPanel using the credentials. Follow the link with port 8090.
https://<Your_IP>:8090

One-Click Redis Install:
To install Redis on your server you have to go to the Manage Services->Application -> Redis then you can see the install button there. Click that and your Redis will be installed.
https://<Your-IP>:8090/manageservices/manageApplications

Now your Redis is installed and you have to install the PHP extension to run properly.
Install Redis PHP extension:
Now go to the PHP-> Install Extension Then you have to select the PHP version for which you want to install Redis Extension. You can also follow this link.
https://<Your-IP>:8090/managephp/installExtensions

Now search Redis on the search bar and you can see the Redis PHP extension press the Install button and everything is good to go.

Setup Redis on WordPress using LS Cache:
Now it’s time to set up Redis on your WordPress site. We will tell you here how you can set up Redis on your WordPress site without any extra plugins. The Ls cache plugin will all do for you. Let’s begin with how to do it.
- In the WordPress dashboard, locate the LiteSpeed Cache plugin on the left-hand menu and click on the Cache option.
- From the Cache settings page, switch to the Object tab, where you’ll find the configurations for object caching.
- Turn on the Object Cache by toggling the option. Once enabled, set the caching method to Redis.
- Update the Redis port to 6379, which is the standard port for Redis, and then click Save to store your settings.
- After saving, check the status indicators on the same page. You should see confirmation that the Redis extension is installed and that the connection test has passed. If both show success, your object caching is correctly configured and ready to go!

Read more: How to create, delete, and manage Child Domains in CyberPanel?
Why Redis CyberPanel is a Game-Changer for Speed and Performance
In today’s online world, speed is everything. Whether you’re running a website, an app, or an e-commerce store, slow performance can drive users away. That’s where Redis comes in—a powerful, lightning-fast data store that helps businesses handle large amounts of data without slowing down.
Blazing-Fast Performance
Imagine opening a website and waiting for it to load. Frustrating, right? Redis solves this by keeping frequently used data in memory, making it incredibly fast. Unlike traditional databases that have to fetch data from disk, Redis serves it instantly, keeping users engaged.
Handles High Traffic with Ease
As your website or app grows, so does the demand on your database. Many systems struggle under heavy loads, but Redis is built to scale. Whether you’re dealing with thousands or millions of users, Redis helps keep things running smoothly without crashes or slowdowns.
Faster Load Times with Caching
Some websites load instantly, while others take forever. One major reason is caching. Redis stores frequently accessed data, like user sessions and product listings, so your website doesn’t have to fetch the same information repeatedly. This results in faster page loads, improved SEO, and a better user experience.
More Than Just a Key-Value Store
Many think of Redis as a simple data store, but it supports advanced data structures like lists, sets, and sorted sets. This makes it ideal for use cases like leaderboards, messaging apps, and recommendation engines, providing a more dynamic experience for users.
Keeps Data Safe and Available
One concern with in-memory storage is data loss, but Redis offers solutions. It provides persistence by saving data to disk and replication by copying data to multiple servers. These features ensure data is safe and available even if something goes wrong.
Reduces Database Load
Databases like MySQL and PostgreSQL are powerful, but when overloaded, they slow down. Redis helps by handling frequent requests, reducing the load on the main database. This improves overall efficiency and system performance.
Perfect for User Sessions and Authentication
Many websites and applications rely on user sessions for login and personalization. Redis is widely used for session management, ensuring that user data is stored and retrieved quickly without unnecessary delays.
Cost-Effective and Open Source
Redis is open source, meaning businesses can use it without expensive licensing fees. Its efficiency reduces infrastructure costs while delivering high performance, making it a cost-effective solution for businesses of all sizes.
Final Thoughts on Redis CyberPanel
If you want your website or application to be fast, reliable, and scalable, Redis is an excellent choice. It improves user experience, enhances SEO, and ensures smooth operations even under heavy traffic. Whether you are running an online store, a social media platform, or a real-time analytics dashboard, Redis can help you stay ahead of the competition.
Here you can read How to log in to the Rainloop admin dashboard.
Read More: How to Change Upload Limit on CyberPanel?
Check out cloudPanel vs cyberPanel.
How to Change Upload Limit on CyberPanel?
You can follow us on Facebook too.
Read About: Redis One-Click Install through CyberPanel
